Marks Management Frequently Asked Questions
1. What is the quickest way to get on-the-fly help for any particular menu command in MMS?
Highlight the particular menu command in question. Press the F1 key and the HELP topic for that command will be displayed. Using the HELP Contents and Find (word and phrases) is still the most thorough way to locate all relevant documentation for any MMS topic.
2. Why do I get an error when I try to send email from MMS?
3. Where can a Registrar class list and student photos be obtained?
A Registrar class list file can be obtained by either of these methods:
- by downloading one through the Student Center (for those who have Peoplesoft access)
- by going to the Registrar's Faculty/Staff Extranet at https://www.extranet.uwo.ca/extranet/. To gain access to this service you must complete the first two pages of the Request for Access to Corporate Information form found at www.uwo.ca/wts/identity/identity_support/cda.pdf. Under the HE-Higher Education heading, check OOR ExtraNet Only. You will be notified when you have been added to the security list and instructions for accessing the Registrar's Extranet will be provided in that notification.
If you do not have Peoplesoft or Extranet access, an administrator in your department may be able to obtain the list for you.
4. How can I get my grades from MMS into OWL?
Note: If your grades came from ScanExam and you are not manipulating them in MMS, then you should not use MMS. See the ScanExam FAQ item called How do I get my grades into OWL?
There is no direct upload path from MMS to OWL as MMS is no longer supported. However, this is a method that can be used if you already have your grades in MMS. Choose File > Export as CSV. The file is created with a .csv extension and you will be prompted to name and save the file in a folder of your choosing. See the FAQ item #20 below on the proper method of opening the CSV file in Excel.
There are two different ways you can format your file so you can import it into OWL:
Create a DPC File (preferred):
- In MMS, choose File > Export as CSV.
- Follow the instructions in FAQ item #20 to open the CSV file in Excel.
- Delete the following columns: Last Name, Given Name, Career Codes, Sec, Status, E-mail
- Delete all grade columns other than the one you wish to import (you can only import one grade column at a time).
- Delete the heading row. There should be no column headings.
- In the grade column, remove any NGR's and replace these with zeros. You can edit these later in OWL.
- Choose File > Save As and for Save as type select Text (Tab delimited).
- Close Excel.
- Find the file using File Explorer in Windows and right-click and rename the file with a .dpc extension.
- The dpc file is compatible for loading into OWL. For help in OWL, please contact WTS or view the OWL documentation available in OWL.
Create a CSV File (only if you are comfortable in Excel):
This will create a file with the column headings Student ID, Student Name, Student Number_X,Grade1[30],Grade2[30],Final[40]
- Delete the following columns: Last Name, Given Name, Career Codes, Sec, and Status
- Delete all grade columns other than the ones you wish to import
- In the heading row, give each of your grade columns unique names that are also different from any grade column names already in your OWL gradebook. The name must be followed by the score the column is marked out of.
- In the grade column, remove any NGR's and replace these with zeros. You can edit these later in OWL.
- In an unused column, copy this formula in to a cell in the second row: =LEFT(C2,(LEN(C2)-7)). Then copy the formula to all cells in the column. This will create a list of the student ID's or usernames from the emails
- Create a new column in column A named Student ID.
- Copy the student usernames, click in the A2 cell, and choose Paste Values from the Paste menu.
- Delete the column with the student formula created usernames, and delete the email column.
- Create a new column between Student ID and Student Number_X and call it Student Name. This column can remain empty.
- Save as a CSV file.
- The CSV file is compatible for loading into OWL. For help in OWL, please contact WTS or view the OWL documentation available in OWL.
Tip: You can export an Excel template for your grades from OWL to see the format. Log into OWL, choose the site for your course, click on Gradebook > Import Grades and choose Download Spreadsheet Template for Excel.
5. How do I get student photos and class lists into my MMS file?
Registrar's Faculty/Staff Extranet
- Go to the Registrar's Faculty/Staff Extranet (https://www.extranet.uwo.ca/extranet/). To gain access to this service you must complete the first two pages of the Request for Access to Corporate Information form found at www.uwo.ca/wts/identity/identity_support/CDA.pdf. Under the HE-Higher Education heading, check OOR ExtraNet Only. You will be notified when you have been added to the security list and instructions for accessing the Registrar's Extranet will be provided in that notification.
- You will be prompted to enter your UWO Email User Name and Password.
- After logging in to the web site, click Class Lists/Photos and follow the prompts on the screen.
- The many individual photo files for your class will be packaged into a single .zip file and the class list file into a single file with an .rcl extension.
- The next step will be to download the class list and photo files to your computer. If you do not already have a folder on your computer where you will manage your course grades, then first prepare a new folder on your computer where you will manage your course grades and where you will download the .zip and .rcl files into. For example, prepare a new folder called myclass and also prepare another subfolder within the myclass folder called PhotoFolder (all one word, no spaces).
- If you download the zip file, you will find that the .rcl file is included. Download the file you want and follow the onscreen instructions carefully. Save the files into the myclass folder on your computer. When you unzip the file (see Step 2 below), save the .rcl file in the myclass folder and save the .jpg files in the subfolder PhotoFolder.
On your Computer
- Start MMS. File > New will initialize a new grade file. When prompted, browse MMS to the .rcl file previously downloaded into your myclass folder. Assign a PIN to the file using File > PINs and save the MMS file using File > Save As. You now have a MMS grade file, the .rcl file is no longer needed. Exit MMS.
- The many individual student photos are bundled into a single compressed .zip file that you previously downloaded into the subfolder myclass and this file must be unzipped before MMS is able to access the photos. If you have Windows XP or Vista, you can open the file with Windows Explorer. You will see the contents of the zip file at this point and must choose File > Extract All. Extract the .jpg files to the subfolder PhotoFolder. (For older versions of Windows, you can download WinZip from www.winzip.com.)
- Start MMS. Student photos are subsequently viewed and manipulated in MMS by choosing View > Grid with Student Photo or View > Class Photo Sheets.
- The following depicts a possible structuring of folders and files on the C: drive as it relates to the above example when using the MMS default for storing student photos in a PhotoFolder, i.e. the location where MMS grade files expect to reference.
Notes:
- The photos for a MMS grade file are not imbedded inside the MMS grade file, they remain external and are generally searched for by MMS in the subfolder PhotoFolder to where the MMS grade file resides. If you move your MMS file the photos do not move automatically with it, you must move the PhotoFolder and its contents with it.
- Alternatively, if you choose to have a single common location for all student photos, you can specify the location of that library in the MMS program under File > Student Photos > Location of Photos > Browse.
- Any library of student photos is compatible with MMS, not just photos from the Registrar. Photos should be prepared as simple jpeg files, named uniquely as either P#########.jpg or #########.jpg where ######### corresponds to the student number to which the photo belongs.
6. Tell me about PINs.
Where do I get my Instructor PIN? How do I create my Instructor PIN?
- If your MMS file was provided by your department, contact them for the PIN.
- If you are creating the MMS file, PIN’s are not preassigned. You must create a PIN before you save the file. Choose File > PIN(s)> Instructor PIN to create it. We recommend that you use the same PIN consistently, since it is impractical to remember multiple PIN’s. During an MMS session, when you open subsequent MMS files, your most recently entered PIN will be tried automatically by MMS, prompting only if necessary.
NOTE: PINs are numeric only, 8 to 12 digits
What if I have forgotten my PIN?
After entering an incorrect PIN twice, you will be prompted with a box asking Would you like to use remote authentication to recall your MMS PIN?. Click OK. In the next pop-up box, you will be asked to enter your Western username and password, then click OK. Provided you are the eligible instructor, the Instructor PIN will then be displayed.
Do I have to put in an Instructor PIN?
Yes. This is due diligence for the Freedom of Information and Protection of Privacy Act (FIPPA). If you were to lose a disk or USB jump drive with an MMS file on it, the finder would not be able to read the information in that file.
Do I need to give out my Instructor PIN to other people?
We recommend that you do not share your Instructor PIN, rather create a Department PIN instead for files that you need to share. Check with your department administrator; they may ask you to use a common one for your whole department. Choose File > PIN(s)> Department PIN to create a Department PIN.
What number do I use for the Department PIN? Do I create it or do I get it from someone else?
The department PIN is optional but we recommend that you check with your department administrator or undergraduate coordinator to find out if they would prefer all members to standardize on a common department PIN. Nonetheless, you may create your own private number for the Department PIN.
Why is the Instructor PIN “recommended” but the Department PIN only “optional”?
The saving of a MMS file requires that at least one or both of the Instructor PIN or Department PIN be set. Some instructors have department adminsitrators do part or all of the set-up, maintenance and final grade submissions of their MMS files. By having the flexibility of Instructor and/or Department PIN access allows the instructor and department to keep their respective PINs confidential, and still both work with the files when they are sent back and forth between each other.
Why do the PINs need to be so long?
The 8 to 12 digits was chosen to ensure that users do not use their banking PINs or other personal information access PINs, which are typically 4 digits.
Can the Instructor PIN and the Departmental PIN be the same?
They can be. In some cases it may be advantageous to do so if you are an administrator setting up several MMS files for multiple instructors.
Who can I call if I am experiencing problems with the PIN?
Please call the SSTS main office, ext. 82152, or 519-661-2152.
For more information on PIN’s, while in MMS click on File > PIN(s) then press the F1 key.
7. How do I correct a "Fatal Error..Registrar Code Mismatch" error?
When you try to Initialize or Update from Registrar Class File and you receive a Fatal Error..Registrar Code Mismatch, choose the option Yes to view the file in Notepad. A typical record in a Registrar Class List file should look very similar to the one below, but yours should not wrap as this FAQ web page unfortunately displays it:
"09","A","1069","2","UGRD","SUBJECTX","152B","001","250999999","Lastname","Given Names","","SSBA3","glastnam@uwo.ca"
RCL files should also have no blanks at the top, bottom or in between the records. If the records in your file do not look like the above sample when viewed in Notepad, you need to obtain a proper RCL file. Ensure that you choose the Report Name MMS Marks Management RCL if using the Peoplesoft Student Center.
See Where can a Registrar Classlist and Student photos be obtained? for more information on obtaining class lists.
8. How can I use MMS if I am a Mac or Unix user?
MMS is a Windows only application and will not install and run directly on other computer operating systems such as Apple or Unix. This is not an insurmountable problem and two suggestions are offered:
- Some Mac and Unix users utilize PC emulators installed on their Mac or other PC platforms. Such emulators permit the installation and execution of MS Windows based applications that would otherwise not be available on their platform. Using such an emulator, MMS and ScanExam may be installed and run on a Mac as if it were a PC. There are a number of different PC emulator programs available for download from the Internet, some are free and some are for purchase.
- Social Science users can access SSC Network software and services from any Internet location using SSC remote access services. For example, the Remote Desktop client for the Mac can be downloaded from www.microsoft.com/mac and once installed, a Mac user may run a remote PC session without the need to install an emulator as described prior or install MMS or ScanExam since these are available on the remote PC. More information about remote access is available on our web site. Check with your IT department to see if a similar service is available in your Faculty or Department.
9. If I use Excel, another spreadsheet, my Mac, or OWL to manage grades and only want to use MMS to submit my final grades to the Registrar, how can I transfer my grades into MMS?
This feature is no longer supported. Grades should be uploaded to the Office of the Registrar through OWL.
Please see the Course Grade Submission page (Instructor > OWL Tools > Gradebook) on the OWL Documentation site for details about submitting final course grades in OWL.
10. How are special codes such as EXCU, INC, etc. entered into a cell?
While inside the grade column cell press Alt-C and a drop down selection list of all special codes is displayed. Scroll the list and click the desired code to enter it. To cancel without selecting a code, click outside of the list or press Esc. There is also a provision for converting all codes, see the Edit menu command Convert Codes.
11. When should a 0 grade be recorded as NGZ?
When you wish to assign a grade of 0 to a student for an assignment, test, exam, etc., then it may be more appropriate for you to use the special code NGZ instead of entering the number 0. Making this distinction is important.
- When a student performs so poorly on a test, assignment, etc. that they actually achieve a grade of 0, then this is certainly an appropriate time to enter a 0 grade.
- When a grade of 0 is assigned because a test, assignment, etc. is missed, then this is not really a measure of student performance on that component, rather it is a special way to represent 0 and it is referred to as NGZ (No Grade Zero assigned).
The code NGZ is treated as equivalent to 0 for all specific student grade calculations and it is also submitted to the Registrar as an actual 0 in a submission file. However, NGZ grades are excluded from column statistics. When considering class performance of a component, the instructor is interested in seeing class statistics that reflect aggregately how students performed. If numerous 0 grades are included in such calculations, then the aggregate results will be skewed downward, not revealing true class performance.
For example, consider a class of 323 students graded on an assignment where 24 students were assigned a grade of 0 for not doing an assignment. The class mean for that assignment calculates as 66.34 with a standard deviation of 23.88. However, when those same 24 students have their assignment recorded using NGZ instead of 0, the class mean for the assignment accurately informs the instructor that class performance is 71.66 with a standard deviation of 15.32.
There are no consequences to using NGZ in terms of calculating student grades. Its use merely distinguishes an achieved 0 versus and an assigned 0. NGZ can be entered into grade cells from the available list of special codes by typing Alt-C and scrolling through the pop-up codes to select NGZ, or multiple conversions can be done by clicking Edit > Convert Codes in a Grade Column > all NGR/empty to NGZ.
12. When MMS student information is brought up to date using a current Registrar’s class list file, is it possible to identify students in the MMS file that are no longer in the Registrar file? This is typical for students who drop a course before the official date for receiving a WDN code.
The MMS Registrar file update refreshes all student personal information for each student in the MMS file that is also in the Registrar class file. New students, i.e. students in the Registrar file which are not found in the MMS file are added to the MMS file. However, locating students in the MMS who are not in the Registrar file is accomplished by:
- Using the Edit menu command to Flag all students (an * will appear in the section code field)
- Performing the Registrar Class List Initialise/Update step
- Using the Tools menu and Sort by Section Code.
Students not refreshed by the update will still have their flag set. The sort brings all flagged students to the top of the display for review. In most cases these remaining flagged students may be deleted from the MMS grade file provided their grade activity is consistent with that of a student who has dropped the course, i.e. they are missing assignments and test grades. However, if the student appears to be active then it is necessary to investigate further as to why the student is missing from the Registrar’s records. Possible outcomes are that the student switched to a different section, failed to complete registration properly (fees) or there is an omission in the Registrar’s records. Sometimes the student must be contacted to help resolve the discrepancy.
13. How are grades from Scan Exam transferred into a column in MMS?
Within the Scan Exam software use the Tool menu command Create DPC file (for MMS loads). The file from this step is loaded into MMS by using the File menu command Load Scan Exam Grades into column. The grades being loaded into the selected column will either overwrite the column contents or update it depending on the option selected. The update option is appropriate for adding grades in steps from different files or for adding the grades for a group of students who write a make up exam at a later date.
14. My course final grades are too low or too high. How can I adjust them to satisfy department standards?
There are three common approaches to adjusting grades illustrated below:
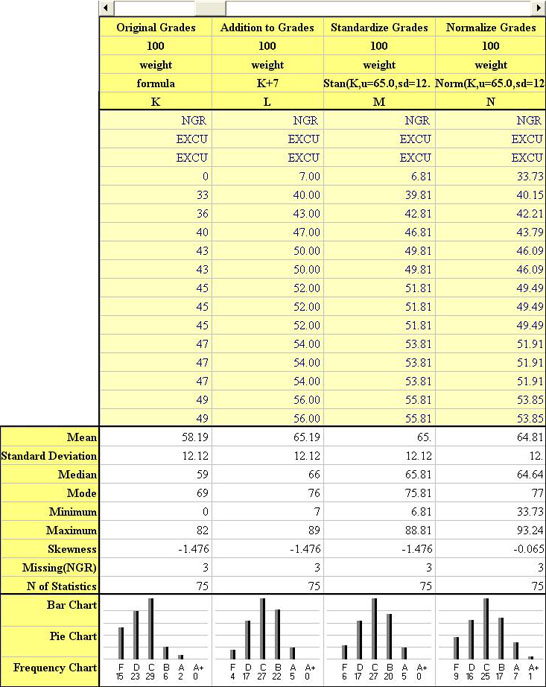
Before taking steps to adjust all student grades to satisfy a desired or imposed distribution consider the possible consequences for doing this. Students are aware of their component grades and the course syllabus describes how final grades are calculated. Unless the syllabus informs students that grades may be subjected to final adjustments, students could challenge or request explanations concerning such grade adjustments. If you choose to use the Standardize or Normalize methods you should have a good understanding of their results.
As illustrated in column L above, the straightforward method for adjustment is to add or subtract a fixed amount to every eligible student. This will alter the course mean upward or downward by the constant that is added or subtracted to all the student grades. It will also potentially change the frequency distribution of A’s, B’s, etc. This approach will affect only the course mean and will not alter the original standard deviation (sd) of the grade set nor will it alter the original spreads that existed between students. To add a fixed amount to every student that will raise the original course mean from 58.19 to approximately 65.0 choose:
Formula > Specific Equations > click output column is L, enter equation K + 7
A second method for adjusting grades is to standardize them onto a new target mean and a new target sd. If you choose to retain the original sd, then the result of this method is identical to the previous add/subtract method. The example in column M above illustrates a new target mean of 65 with the original 12.12 sd. This technique converts the student’s original grades to Z values and then uses the individual student Z values to calculate their new grade such that the new course mean and new sd will be achieved. If an sd is selected which is different than the original then the spreads between student grades will depart from the original spreads. Using the above example, to standardize to the new mean of 65 with the original 12.12 sd, choose:
Formula > Standardize > click output column as M, enter target mean as 65.0 and target sd as 12.12
A third method for adjusting grades, illustrated in column N above, is to normalize them to a new target mean and a new target sd. This method is sometimes referred to as placing the grades on the bell curve. This is accomplished by converting the original student grades into percentile scores and then mapping those percentiles to the Normal Distribution to obtain normalized Z values. These special Z values are subsequently used to create the new individual student grades that will approximate the desired target mean and sd. By choosing the original grade distribution sd as the target sd there will be less radical differences between the original grade spreads and the new grade spreads. Using the above example, to normalize to the new mean of 65 with the original 12.12 sd, choose:
Formula > Normalize > click output column as N, enter target mean as 65.0 and target sd as 12.11
15. How do I manage grades for a large course where marking is delegated amongst a group of markers or teaching assistants?
Using a Simple Text File
The simplest for the instructor is to require the markers to provide all their grades in computer text files, prepared using a text editor such as NotePad or WordPad. The marker’s files must contain only student numbers and grades in a free format, one per line using a tab or comma to separate the student number and grade. For example:
345789201 67
156777652 81
250001234 72
The markers should name their files according to an agreed upon course convention, e.g. BIO23-LAB1-TAjsmith.dpc. The marker’s files may be easily mailed to the instructor as file attachments and the instructor subsequently extracts the file attachment onto disk and then loads it into MMS using the same process as that used for loading Scan Exam grades, i.e. use the MMS File menu command Load Scan Exam Grades into column. When loading the grades into a selected column, always choose the update option. This option permits the loading of grades in steps, using multiple files, one at a time.
Using MMS
If the markers collected their grades in MMS, the Match Copy/Paste feature from MMS can be used. The following steps describe how:
- The person maintaining the Master Marks Management file should open Marks Management twice. One instance should be open with the Master MMS file and the other with the Lab or Tutorial section MMS file.
- In the Lab or Tutorial section MMS file choose Edit > Match Copy from MMS to Clipboard and select the final grade column identifier.
- In the Master MMS file choose Edit > Match Paste from Clipboard to MMS and select the column identifier representing the column where you wish to place the lab grades. For students not in the current lab section an NGR will be inserted.
- When adding subsequent lab sections you will receive a warning. You should click on NO so that the column is updated and NOT overwritten.
- Repeat until all lab sections have been entered.
16. How do I e-mail individual grades and file attachments?
17. How do I post the marks on my course web site?
UWO provides OWL course web sites for all instructors to use for many of their course related functions, including the ability to provide secure "posting" of student grades. Posting student grades in any other non-secure web sites is prohibited because of privacy legislation.
See question #4 above for instructions on transferring your grades from MMS to OWL. OWL and MMS differ somewhat in how they manage student information. OWL uses the student’s unique Western e-mail address while MMS uses the Registrar’s unique student number. MMS also maintains student e-mail addresses, consequently it is capable of linking its information to OWL using e-mail address information. It is important however, that both the MMS and the OWL files are initialized from Registrar files to ensure accuracy between the two systems.
An alternative to posting is to use MMS's built-in personal student e-mailer as it is described in item #13 above.
18. How do I open an MMS file by just double clicking on its name?
You must declare the mms file type in Windows (Windows Explorer > Tools > Folder Options > File Types) to be opened with the Marks Management program. Subsequently all files with the .mms extension may be opened by double clicking the file name.
19. Where are descriptions of the Registrar Career Codes?
Visit www.extranet.uwo.ca/extranet/codebook/ to find out more about career codes.
20. I used the Export as CSV... command in the File menu. Now when I open my file in Excel, Student numbers and Sections are displayed without leading zeros.
Instead of using the Open command to open the CSV (Comma Separated Values) file in Excel, open a blank Workbook in Excel and import the CSV file as follows:
- Choose Data > (Get External Data) > From Text.
- Select your file and click Import.
- Choose Delimited, check My data has headers, and click Next.
- Uncheck Tab and check Comma as the delimiter and click Next.
- Select the column with the student numbers and ensure Text is selected for the Column Data Format.
- Click Finish and OK.