Marks Management for New Users
- Install Marks Management Software (MMS)
- HELP within MMS
- Initialize MMS Class File from Registrar Class Information
- Managing Grades in MMS
- Screen Views
- Treatment of Missing Grades and Special Registrar Codes
- Editing MMS Files
- Load Scan Exam Grades into a Column
- Print Post-it Grades with Masked IDs
- Print Columns with Student Names or Student Numbers Only
- Print Student Summary and Instructor Comments
- E-Mail HTML Formatted Grade Postings
- Registrar Grade Reports
1. Install Marks Management Software (MMS)
Use a web browser to visit ssts.uwo.ca/network/software_resources/downloads.html and download the install package (mmsvb6zse.exe) into a temporary folder on the C: drive. Double click this file to execute the software installation. The MMS software is subsequently run from:
Start > All Programs > Marks Management > Marks Management
Note: It is important to uninstall any older versions of the Marks Management System prior to installing the current version.
2. HELP within MMS
The HELP menu command provides the best source of documentation for all the features and operations of the software. A Table of Contents and full text word/phrase searching is provided for finding information. A quick lookup of a help topic for any of the commands that appear in the menus is provided by pressing the F1 key while the command is highlighted.
3. Initialize MMS Class File from Registrar Class Information - FIX LINKS
The recommended method for beginning a MMS class mark's file is to first load the student information from an electronic copy of a Registrar's class list. Class lists can be obtained through the Student Center or the Office of the Registrar Extranet. This file can be input into MMS using the File > New or File > Initialize/Update with Registrar Class File commands.
A MMS class mark's file which is initialized from a Registrar's file will have the internal Registrar's Class Code which is required if you intend to use MMS to submit grades to the Registrar using the Grade Submission Form or the Registrar's E-File Grade Submission file. After the initialization, you may enter grades by typing them and/or loading them from external files such as provided by the examination scoring software ScanExam II. As a term progresses, or at least prior to submitting final grades, a current class list should be obtained and used to update the MMS file to properly reflect student status changes (e.g. WDN), late adds and drops.
4. Managing Grades in MMS
There are numerous ways in which MMS grade columns may be set up. Many instructors prefer to predefine their grade columns and leave final grade calculations to MMS. Others prefer to set up columns as needed and calculate grades using a combination of personal formulae and MMS built-in functions. The following two examples predefine their grade columns with the second example illustrating one technique for calculating grades where some marks are excused.
Example 1
A course syllabus states that a student's final grade will be based upon the following:
- 10% Assignments, calculated as each student's best 3 marks taken from 4 assignments, note: each assignment is marked out of 15)
- 25% Test#1 (marked out of 100)
- 25% Test#2 (marked out of 100)
- 40% Final Exam (marked out of 100)
Every MMS grade column has a header containing its title, perfect score, weight, formula and a fixed identifier letter A through AZ which is used to reference it concisely in calculations. Typically, empty column headers in MMS look as follows:
The columns for the four assignments may be set up as shown below. Note that you do not specify weights or formulas for these columns because they are not directly used in the Final Grade calculation; rather they are intermediate to creating the Best of column. Click into the cell and type the titles and perfect score values. The column for receiving the sum of the best 3 assignments from the 4 is column E.
Click into the cell and type the title, perfect score, and the weight that this grade column will ultimately carry to the final grade calculation. The derivation of the best three assignment marks is done with the MMS formula Best(3,A,B,C,D). Formulae cannot be typed directly into a column cell, you must use the Formula Menu and then select the Best Sum function.
You are then prompted for the information needed with a screen as shown below. Simply click the relevant columns and type in the best of value to be 3.
Note that the perfect score for this column should be set to 45 representing the largest sum that should occur if any student has 3 of the 4 assignments perfect, e.g. 15, 12, 15, 15.
The columns for recording the grades for the two term tests and the final exam may be set up as follows:
The column to receive the final grade calculation is set up as follows:
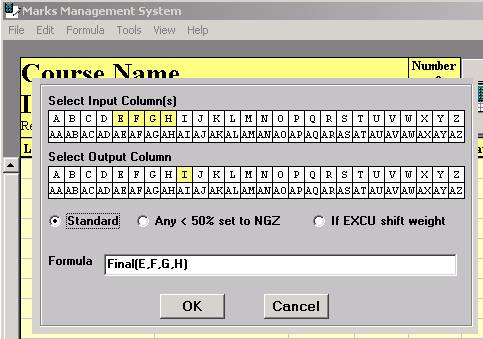
The title and perfect score are typed directly into the cells. There is no need to specify the weight since weight only has relevance when a grade column is itself used in the Final grade calculation. Keep in mind that column I is merely receiving the results of the final grade calculation. The Final formula is entered by using the Formula Menu and selecting the Specify Columns for Final Grade Calc. The Final formula will verify that the columns specified have their weights sum to 1 and evaluates each student’s grade based upon the weights and contents of the input columns. For example, the above Final(E,F,G,H) calculates as (E/45*100*.10) + (F/100*100*.25) + (G/100*100*.25) + (H/100*100*.40). Refer to the HELP Final Formula for a generalized description and also the section on treatment of missing grades in calculations.
A formula plus its associated grade column statistics are evaluated when the large Calculate Command Button (see depiction below) is clicked. Unlike spreadsheets that dynamically re-calculate with every cell change, MMS only displays a Calculate Recommended message and leaves the timing of re-calculations to you. When the Calculate Command Button is clicked, an icon of an hourglass appears while all calculations and statistics are performed.
After the final grade column is calculated, you may wish to transform the column into other columns to experiment with various adjustments such as rounding or bumping grades which are on boundaries such as 49, etc. The graphics also give you a visual feel for class performance on a particular column that in turn may lead you to make adjustments.
Note: The Final formula, as with all formulae, recalculates anytime you click the calculate button. This is not a problem unless you want to make permanent changes to individual grades that are located in a column that is derived from a formula. MMS blocks individual grade adjustments in a column that is derived from a formula. If you wish to make individual student grade adjustments in such a column, then remove the formula with the Clear Formula command found in the Edit Menu. This will allow edits to the column.
Example 2 - Excused with weight shifting
The grading scheme is identical to Example 1 except that students may be individually excused from Quiz#1 and/or Quiz#2 for a legitimate reason. In other words there is no provision for makeup quizzes; students who miss a quiz for a legitimate reason are excused and will have the weight of the missed quiz shifted to the final exam. Students who miss a quiz without a legitimate reason receive a grade of zero for that quiz.
Column I Final(E,F,G,H) EXCU=F>H,G>H
The rule EXCU=F>H,G>H provides for automatic shifting of weights as part of the Final formula for Column I. This shifting rule is specified as a processing option when the Final grade function is set up. The particular rule shown declares that the weight of column F is shifted to the weight of column H when an EXCU code is encountered in column F. Similarly the weight of column G is shifted to column H for an EXCU code in column G. See Final and Term in the HELP for more information.
5. Screen Views
There are four views available from the View menu. The view may be changed at any time. The first of these is Grid Only which displays student and grade information only. The second is Grid with Statistics and Notes which displays fewer students on the screen but includes column statistics, graphs, Student Summary and Instructor Comments. The third view is Grid with Student Photo which displays student pictures if they are available. The fourth view is Class Photo Sheets which displays multiple student photos without any Grid (see HELP for more information on student photos).
6. Treatment of Missing Grades and Special Registrar Codes
Any grade cell, which is empty or contains the string NGR (No Grade Recorded), is considered to be a missing grade. In addition to code NGR, the following special Registrar codes will also be treated as missing for the purposes of mathematical calculations: AUD, COM, FAIL, HON, INC, IPR, PASS, SAT, SPC,SUP,XTRA,EXCU (see below for entering codes). A missing grade encountered in a mathematical computation will cause that calculation to have a result of missing (NGR). There are important exceptions to this which rely on the use of the special code EXCU (excused), see below for details.
Entering Special Codes
Special codes may be inserted into any grade cell by clicking into the target cell, then hold down the Alt key and press C. This will cause a small scroll list to appear from which the desired code may be selected. Clicking the desired code will transfer it into the grade cell but for it to be retained you must complete the change by pressing enter, tab, or the up/down arrow key. Selected codes may be set across all students, see the Edit menu for more information. Use of certain codes for final grade submission is controlled by the Registrar. It is advised that you first check with the Office of the Registrar before submitting grades that contain codes.
Special Code EXCU
The special code EXCU (excused) is treated as missing, however under specific conditions it is used to provide flexibility for calculating an alternative individual student grade. The EXCU code may be entered the same way as the other special codes or an Edit menu command is available for converting all NGR or empty cells to EXCU for a particular column. Alternative grade calculations occur when the EXCU code is used with Excused Averaging, Final and Term calculations using weight shifting rules and the Best Sum and Best Average formulae.
- The Excused Averaging formula calculates a mean for a set of columns by adjusting the calculation accordingly for each student who has the code EXCU recorded in one or more of the grade columns being averaged.
- The Final Grade or Term Grade calculation when used with weight shifting provides a simple method for adjusting student grades in the presence of EXCU codes. When the Final and Term formula includes weight shifting rules, the presence of an EXCU code for a student may cause the student grade to shift the weight of the excused grade to the weight of another grade as defined by a shift rule.
- The Best Sum formula is designed to calculate the highest sum from a set of grades. For example, a course may give 5 assignments but allow every student to use their best sum of 3 of the 5 to calculate their component for the assignment part of their grade. If some of the 5 grades in the set are missing (i.e. empty, NGR, EXCU, etc.), and at least 3 valid grades exist, the best sum calculation is performed. Refer to the section on Best Sum of a Set of Grades for more information on how the EXCU code may substitute for NGR.
- The Best Average formula is designed to calculate the highest average from a set of grades. This formula selects its values based on which are the largest percentage expressed relative to their individual perfect values. If there are not enough grades to calculate the best average for a particular student, i.e., NGR, empty or EXCU cells, then the best average result is set to NGR. The EXCU code will substitute as a result for NGR for a student if an EXCU code appears in at least one of the columns in the set being used for Best Average.
If a normal or an alternate grade cannot be calculated for any reason, the missing NGR code typically results; however when the EXCU code appears as one of the grades that contributes to a result of a missing value, then the EXCU code is retained rather than the NGR code.
Caution: An EXCU code resulting from one missing calculation may propagate into other calculations.
Special Code NGZ
A special code NGZ (No Grade Zero assigned) is treated as zero for a student grade calculation but treated as missing for column statistic calculations. This code permits an instructor the ability to distinguish between an assigned grade of zero (NGZ) versus an actual performance grade of zero (0) for an assignment or test. The NGZ code may be entered the same way as the other special codes or an Edit menu command is available for converting all NGR or empty cells to NGZ for a particular column.
7. Editing MMS Files
Most cells in a MMS file may be edited by first clicking the mouse pointer in the cell to be changed. When a cell is in edit mode its background colour is white. Movement from cell to cell using the keyboard is accomplished by pressing the Tab key to move to the right and Shift+Tab to move to the left. The Enter key, up-arrow and down-arrow moves from student to student. The horizontal scroll bar above the grade columns is used to move across grade columns A through AZ. The quantity of grade columns appearing on the screen can be increased or decreased by stretching or shrinking the application window and is restricted only by the capacity of the screen.
The formula cell may not be edited directly, rather it is set by selecting one of the items available from the Formula menu. The contents of a formula cell may be erased with the Clear Formula command described below.
The student Status cell (e.g.WDN), course section, Type (e.g. UGRD) and the Registrar's Code field can not be edited and is changed only under program control using information from an Initialize or Update from Registrar class file command.
Clipboard Cautionary Note
The Copy/Paste and Match Copy/Paste commands are powerful edit tools useful for moving information to and from other Windows applications. The Copy/Paste commands do so without regard to student number matching. The preferred method for moving grade columns or importing grades from spreadsheet packages is the Match Copy/Paste commands which ensure that grades are pasted using student number matching.
8. Load Scan Exam Grades into a Column
MMS will load into a selected column, the grades recorded in any ASCII file that is formatted to contain a student number and a mark separated by a tab or comma, one per line. This format is consistent with the output file produced from Scan Exam which has the file extension DPC. This file is suitable for loading into MMS.
If the Scan Exam DPC grade file was obtained via e-mail, it must be extracted from the mail system into a disk file with all the typical mail delivery headers removed from it. Most mail systems permit file attachments and this is the prefered way to obtain and send files of information. If the information comes as part of the e-mail message rather than as a file attachment then you must extract the mail into a file and then remove the header lines with an editor such as the Windows NotePad Editor. The removal of all extraneous header lines must be done before loading the file into MMS The DPC file should only contain lines that resemble the sample illustrated below.
251440338<tab>71
251990688<tab>53
250594937<tab>58
251444553<tab>29
The Scan Exam DPC file load sequence begins by first arranging the MMS file into student number order and then loading the DPC file grades into the designated column based upon student number match. Student numbers in the DPC file which are not found in the MMS file are not added, but diverted into the file mmsdpc_yyyymmmdd_hh-mm-ss.err, eg. mmsdpc_2002Jul23_14-24-53.err. Only students matched during the load have their grade set while all students not matched in the load receive a grade of NGR which is interpreted by MMS in all calculations as missing.
If the column selected to load the Scan Exam grades into is non-empty, MMS will ask if that column should be overwritten (as described above) or updated. An update situation would typically correspond to a makeup exam where only a subset of students have grades to be changed while all the others would remain unchanged. The default is overwrite.
9. Print Post-it Grades with Masked IDs
Print Post-it Single Column with Masked Student Ids
A single MMS grade column with the first four digits of the student number masked may be printed in a compressed format to minimize the number of pages required to create a postable copy of student grades. This format does not support printing of multiple columns per student or grade column statistics; please refer to the next section for this capability. The compressed format will print varying amounts of information to the page based upon the following:
- letter size (8.5x11) portrait approx 270 students
- landscape approx 235 students
- legal size (8.5x14) portrait approx 355 students
- landscape approx 315 students
Print Post-it Multiple Columns with Masked Student Ids
Multiple MMS grade columns with the first four digits of the student number masked may be printed to create a postable copy of student grades. Refer to the section below, Print Columns with Student Names or Student Numbers Only, for estimates of page capacity in terms of number of students and number of columns. Note: This print procedure automatically invokes a student number sort which is based upon only the last five digits of the student id and will result in the rearrangement of the order of the marks file.
Note: These print procedures automatically invoke a student number sort which is based upon only the last five digits of the student id and will result in the rearrangement of the order of the marks file. As such, a new Sort item has been added to the Tools menu to sort by the masked student number.
10. Print Columns with Student Names or Student Numbers Only
Multiple MMS grade columns can be printed in conjunction with student names and numbers or with student numbers only. The associated column statistics are not included with the report but these may be printed separately. If you wish to print the information for only one student or a selected group of students, use the flag feature to first select the desired students and then use the Print Flagged Students Only menu item.
This print procedure does not presort, hence you should ensure that the desired sorted order is done prior to the print request (use Sort from the Tools menu). MMS will first prompt for the set of columns (A-AZ) to be printed. Click all the column letters that you wish to include in the printed report. A printer dialogue box is then presented for confirmation of printer destination and to permit changes to the paper type and orientation if the printer supports those capabilities. MMS will format for letter and legal size paper in both portrait and landscape mode. The following are approximate per page capacities:
- letter size paper (8.5x11) portrait, with names, 40 students and 3 columns
- letter size paper (8.5x11) portrait, no names, 40 students and 6 columns
- letter size paper (8.5x11) landscape, with names, 29 students and 5 columns
- letter size paper (8.5x11) landscape, no names, 29 students and 8 columns
- legal size paper (8.5x14) portrait, with names, 54 students and 3 columns
- legal size paper (8.5x14) portrait, no names, 54 students and 6 columns
- legal size paper (8.5x14) landscape, with names, 29 students and 7 columns
- legal size paper (8.5x14) landscape, no names, 29 students and 10 columns
Note: These formats are not suitable for posting. They are for instructor use only.
11. Print Student Summary and Instructor Comments
The student summary and associated instructor comments may be printed in a format quite similar to what is viewed on the screen. The print version of this information allows the instructor to specify which of the grade columns to include whereas the screen image always shows all grade columns in use, many of which are often working or temporary use columns. Only students that are flagged will be printed. Use the flag feature to select the desired students prior to printing. The format is such that each student’s information appears on a separate page and this has the potential to produce a very large amount of print. Hence the requirement for flagging and the prompt of a cautionary note when this print option is requested.
12. E-Mail HTML Formatted Grade Postings
A send only e-mail tool is provided for simplified mass distribution of individualized student course grade information formatted as HTML or text e-mail. The mailer is also capable of sending a common general e-mail message and common file attachments to every student in the class. An instructor may experiment with these features by using the Send Sample E-mail to Instructor item to send a sample student e-mail to their own e-mail address prior to doing a bulk mailing to their students (for more information on this feature, read the pop-up note that precedes every sample send).
The Mail From: address used by MMS for these bulk mailings does not require the instructor’s personal e-mail address, rather it may be set to a teaching assistant’s e-mail address, a generic course e-mail address, or the default noreply address, which prevents student replies when a one-way communication is intended. Carbon copies of the e-mails sent to students are retained in disk folders (named mailfolder1, mailfolder2, etc.) for possible later reference, archival and simple bulk disposal at the conclusion of the course.
Student e-mail addresses are available within a MMS course file provided that it was initialized or updated using an official Registrar class list. The e-mail addresses are the student’s official University assigned addresses; however, students do not always use their University e-mail address, preferring instead their private off-campus e-mail. The University prefers that all official student e-mailings be sent to the student’s official university e-mail address. Consequently, if e-mail communications will be used in a course then the students should be instructed to expect such communications through their University e-mail address. A student has the option of explicitly setting automatic forwarding of their University e-mail address to their preferred off-campus address, however, the University can not ensure arrival of forwarded e-mail. A test class mailing should be done to ensure that all students properly receive course related e-mails.
Individual student e-mail addresses may be edited using the Edit menu but be aware that edited addresses will be over written if a Registrar class list is used to update the MMS course file. Use of E-mail requires that the MMS course file have access to the Internet, a valid SMTP mail server, a Mail From: address and a mail Format type (HTML or Text). The last three are preferences, which are recorded as part of the MMS course file and must be set for each MMS course file. This association of specific settings with a course file permits an instructor to manage different courses with their own unique settings. Note that the default mail format is HTML if not explicitly reset to Text. The HTML setting provides for much richer formatting of grade messages. The default Mail From address is noreply to discourage the possibility of hundreds of cordial student replies of thank you. The default for authentication of the SMTP server at UWO is No, i.e. the UWO server does not require the instructor’s username and password to send mail from UWO locations. See the next section for sending mail from off-campus locations.
Sending E-Mail from your home computer using your home Internet provider, such as Roger’s Highspeed or Bell Sympatico, requires that you use their mail server and not Western’s smtp.uwo.ca server. Most commercial internet providers require authentication (username and password as provided to you by Rogers or Bell) to send mail through their mail server. MMS is capable of sending mail from your home through the home service provider, but you must change the mail server name in MMS to the name required by your home service. For example, at the time of writing this Help note, the Roger’s mail server was smtp.broadband.rogers.com and you must also change the authentication option to Yes, because this server requires authentication. When mail is sent by MMS, you will be prompted for your Roger’s username and password. This personal access information is not stored in any way by MMS, consequently you will be re-prompted at the start of each new MMS bulk class mail send operation. Bell Sympatico customers in Ontario will use either smtp1.sympatico.ca or smtp8.sympatico.ca depending on their service.
13. Registrar Grade Reports
Instructors are cautioned that most all MMS reports inherently contain student information which is protected by privacy laws. The use of such information is for instructor course management purposes only. All reasonable precautions must be taken by instructors to ensure that student personal information is never publicly displayed and when discarded should be shredded or destroyed in a manner approved by the university.
The Office of the Registrar Grade Submission and Grade Revision printed report with appropriate signatures form the only official grade submission record. In addition, an encrypted file for Grade Submission and Grade Revision may be created and separately forwarded in accordance with guidelines set down by the Registrar and/or by your department. Associated with this, MMS also provides a direct send e-file option that also creates the encrypted e-file and sends it to the Registrar as a convenience. The send feature may be used provided that the instructor is within the UWO IP address space and they authenticate with their UWO username and password (authentication occurs inside an encrypted secure shell). The policies and procedures surrounding your use of any of the print or electronic submission formats are subject to rules of the Office of the Registrar and your department. Please be aware of those procedures before submitting grades. To submit files directly using MMS choose:
File > Registrar Reports > Grade Submission > e-file form > create and send file to Registrar
A message will be displayed confirming the successful transmission of the e-file. The path of a copy of the encrypted e-file will also be provided. If you wish to submit the encrypted e-file via one of the other methods approved by the Office of the Registrar, you can create the e-file by choosing:
File > Registrar Reports > Grade Submission > e-file form > create file only
Note: This method of Grade Submission will only be accepted until April 30, 2010. Grade submission will be done using WebCT.
Grade Revisions
The Grade Revision format is only appropriate for requesting grade changes to an existing grade that is already posted to the student's Registrar course record. A grade revision requires both the original grade column and the revised grade column (to the right of the original) in order to satisfy the grade revision requirements of the Registrar. Grade revisions are only generated for the subset of students who have been flagged (see Edit > Flag Operations). To submit the Grade Revision choose:
File > Registrar Reports > Grade Revision > e-file form > create and send file to Regsitrar (or create file only)
When prompted to Select Columns, choose both the original grade column and the revised grade column. Proceed as per Grade Submission instructions.
Note: This method of Grade Revision will only be accepted until April 30, 2010. Grade revision will be done using WebCT.